Showing posts with label chocolate. Show all posts

Friday, 6 February 2015

The Chocolate Challenge - Tempering

Dear readers,

Tempering is required in order to get the cocoa butter into the correct crystal form for the chocolate to have a good snap and sheen. Cocoa butter is polymorphic and, if melted chocolate and left to cool without tempering, it will result in chocolate bloom (the fat will crystallise and appear on the surface).

Tempering requires practice and can be rather tedious. At work I have tempered chocolate using the water bath method (constant stirring of the chocolate in a bowl whilst heating and then cooling it slowly in a water bath). This method is slow and requires a lot of arm power! However, it is well controlled.

Another method for tempering chocolate is by seeding it; some pre-tempered chocolate in very small pieces (i.e. shavings) is added to the untempered chocolate (which must be at a specific temperature so that it doesn't melt the shavings) to "seed" the correct cocoa butter crystals. This is probably not a suitable method for a single origin bean to bar chocolate since one wouldn't want to taint the flavour.

So, I decided to try marble tempering, or granite tempering in my case (since I did not have access to marble). I read on Cherrapeno's blog that it is possible to temper using granite if marble isn't available.

My first attempt at tempering using a granite floor tile

I watched a Youtube video to guide me (unfortunately I cannot find the one I used to share with you). For some reason I was quite nervous during my first attempt at tempering. However, it is easy to re-melt the chocolate and try again if it has been unsuccessful (this is the convenience with making plain bars rather than individual chocolates with fillings or inclusions).

In short, one has to heat the chocolate to 42ºC in order to melt out all of the fat crystals. Then about three quarters of the chocolate is moved around on the slab with spatulas (cleanly, unlike myself, as one can see in the picture!) in order to cool it to below 27ºC. The temperature to which one needs to cool the chocolate does depend on the type (dark, milk or white) and other factors. Once the chocolate has cooled to the correct temperature, it is added to the remaining warm chocolate and stirred thoroughly. The warmth from the non-cooled chocolate should warm the cooled chocolate up to 31ºC which melts out all of the "bad" (i.e. unstable) fat crystals leaving only the "good" crystals (i.e. form 5, the most stable of the 6 polymorphic forms of cocoa butter). The chocolate should then set in a tempered state.

It takes a lot of practice and I am still trying to get my head around it, however, I am improving! Once the chocolate is tempered, however, one needs to mould it...

Thursday, 21 August 2014

The Chocolate Challenge - Conching

Dear readers,

Eeeeek... over two months have passed without my posting on here! I'm so sorry! Life has been even busier than usual and very chocolaty too. Those of you who follow me on Instagram will know what I've been up to! Sorry to ruin the surprise, but I completed my first bar a couple of months ago and I'm now on my third batch of chocolate! I am learning a lot, and I have much to share with you!

The fourth stage of my home chocolate production is conching. There are two main purposes for this stage; flavour development and texture development. In essence, conching is the churning of the chocolate at an elevated temperature (ideally 40°C to 50°C) for an extended period of time.
 
I mentioned in my refining post that I bought a stone grinder because I would be able to carry out two stages of my chocolate production with it (grinding and conching). Although the machine has no temperature control, some heat is produced from the friction during the mixing. This keeps the chocolate at around 30°C which seems to be good enough to "conch" the chocolate!

I conched my first batch for 24 hours and despite the small particle size (from the grinding), it still felt a little dusty in the mouth and not very creamy. I decided to conch my second batch for 48 hours. The difference was quite significant! The extra conching time gave the chocolate a much smoother and creamier texture. This is due to the even distribution of the cocoa butter coating the sugar and cocoa mass particles. During the conching process there is also flavour development from the release of volatiles, which reduces the acidic and astringent notes. This makes a more rounded flavour and better overall quality chocolate. Delicious!

The next stage is probably the most tedious... tempering!

Tuesday, 10 June 2014

The Chocolate Challenge - Refining

Dear readers,

Firstly, sorry for my absence from this blog! I know that I keep saying it but life has been crazily busy!

The third stage of my home chocolate production involves
refining. In order to make the chocolate smooth, the particle size of the ingredients must be below 20 microns; which is undetectable by the tongue. It's actually quite difficult to get hold of equipment which will grind the cocoa beans (and sugar) to this size. I discussed refining with Willie Harcout-Cooze and he recommended a small machine which he uses to produce small batches of chocolate when sampling new cocoa beans.

I decided to go for it and buy the machine! It is a stone grinder for Indian cooking. It wasn't too expensive, and I managed to convince my father to buy it for me as a combined late birthday and Christmas present! I figured that since I would be able to carry out two key stages of the chocolate processing (refining and conching) in the one machine, it would be well worth it.


Firstly, I put the roasted and winnowed beans into a standard food processor to turn the beans into a paste. I also used a hair dryer to melt the cocoa butter in the beans. Then I added the paste to the stone grinder. This, in my opinion, is where the magic really happens in chocolate production. This is the point at which the cocoa beans turn into chocolate; the gorgeous glossy cocoa liquor! The friction in the machine produces some heat which helps keep the ground beans liquid.

It took a few hours for the chocolate to lose all of its graininess (particles less than 20 microns) and became smooth. However, further flavour and texture development of the chocolate is required which is achieved by the conching process.

Monday, 5 May 2014

The Chocolate Challenge - Winnowing

Dear readers,

The second stage of my home chocolate production is winnowing the roasted beans. Winnowing involves the removal of the shell and can be carried out before or after roasting and there are advantages and disadvantages to both. Since the shell is very difficult to remove before roasting and would require some form of pre-treatment, I decided to roast my beans first. The major disadvantages of winnowing post-roasting is that some of the cocoa butter is lost in the shell and more energy is required to roast the beans. However, I have plans for my shells so there is no loss of product!

I simply cracked the beans and separated the shells using my hands. This can be quite tedious and time consuming, but it was fine for a small batch of 1kg. I did, however, suffer a minor injury of a sharp piece of shell underneath my thumbnail!

Another method involves cracking the beans and shells together and using a fan or hairdryer to blow the lightweight broken shells away from the broken nibs. I decided not to do this because I wanted to save all of the shells.

Monday, 28 April 2014

The Chocolate Challenge - Roasting

Dear readers,

The first stage of my home chocolate production (after sourcing already-fermented beans) is roasting.

At La Iguana Chocolate, they roast their cacao beans in a pot over a fire and stir constantly for 10 to 20 minutes until they hear the beans "pop". I asked Jorge (the eldest son of the family) how I should roast the beans at home. I asked if I should use a frying pan and wait for the "pop" and he replied...

"yes, do add a little of water just to wet the bean no make a sopa OK, good luck".


Following Jorge's advice, I added a splash of water to the beans in the frying pan and turned the heat up high, stirring constantly. Once I started to hear the loud "pops", I turned the heat off and continued stirring the beans until the popping stopped (one has to be careful; they can move when they pop so it might be an idea to use a splash guard). The aroma that came from the beans was extraordinary! The whole house smelt of brownies. I went out and came back a few hours later and the whole house still smelt of brownies; it was incredible! I definitely recommend roasting a few cocoa beans before a house viewing instead of baking bread. I'm sure it will be much more effective!

Slightly-wet beans before heating

Beans during the "roasting"

I recently attended the Food And Drink Expo in Birmingham and met Willie Harcout-Cooze from Willie's Cacao. I spoke to him about roasting and he said that I should not do it in a frying pan because the beans should not be exposed to direct heat. He recommended that I roast them in an oven on a baking tray with some baking paper. However, at this point I had already roasted most of my beans using Jorge's method. I will definitely try roasting the beans in the oven next time!

Wednesday, 2 April 2014

The Chocolate Challenge - Processing Chocolate from Bean to Bar at Home

Dear readers,

Having been inspired by the improvisation at La Iguana and my desire for understanding the chocolate production process, I have decided to attempt the processing of my own chocolate at home
from bean to bar. Sadly, I don't have access to fresh cacao beans here in England. Therefore, I will have to omit the first few steps (the harvesting, fermenting and drying of the beans). Unfortunately, I do not have enough beans from La Iguana to carry out this challenge; so I have bought a separate 1kg batch of fermented, unroasted Criollo beans from South America. The remaining steps I intend to carry out to process a ~70% cacao dark chocolate bar will include:

1. Roasting
This should be one of the most straightforward stages. There are two main techniques which I can carry out at home for this step without having access to specialist equipment.

2. Winnowing
This is, effectively, the removal of the shells of the cacao beans once they have been roasted. There are, again, two main techniques for this method which should be feasible at home.

3. Refining
This is the first step that will be quite challenging since it will require specialist equipment. The size of the cacao particles will need to be below 20 microns in size in order for them to be undetectable by the tongue. It will be difficult to track down a refiner which I can use at home to get the particles to this size!

4. Conching
Once I have refined the cacao and added the sugar, the chocolate then needs to go through the conching process. I anticipate that this will be the most difficult stage of the home chocolate processing. It involves the churning of the chocolate at a continuous speed and elevated temperature for a minimum of 12 hours. I have doubts about my ability to complete this stage!

5. Tempering
I have already tempered chocolate, but not at home. There are three techniques for tempering; the marble method, the seeding method and the water bowl method. If I manage to track down a slab of marble, then I will attempt marble tempering!

6. Moulding
This should be simple enough, however, it depends on how I wish my chocolate to be moulded. This will involve either searching for a suitable mould or trying to create one myself.

Before I carry out any of the processes, I plan to read about home chocolate processing as much as possible. I, of course, expect to come across plenty of bumps along the way but this is all part of the learning process. I can only hope that I will manage to overcome these obstacles so that I can complete the challenge and taste my own homemade chocolate!


If anyone has any advice or ideas then please do share them!

Thursday, 13 March 2014

Vosges Haut Chocolat Chocolate Bar Review

Dear readers,

I first discovered Vosges Haut Chocolat when I came across Mo's Dark Bacon Bar in a local supermarket in Davis, California. At work, I have been co-writing an article about innovative new confectionery products for Kennedy's Confection Magazine each month. During my searches I came across Vosges again and I have fallen in love! Some of their bars sounded really interesting and unusual and nothing like I had tried before.

I decided that I had to try some of them. I checked the cost of international shipping and was quite shocked to find that it was $75! When I used to live in California and posted things to friends at home it cost around $20. I have a friend who lives in Los Angeles so I asked him if he could do me a huge favour by going to a Vosges Haut Chocolat store in Beverly Hills, buying me some of these incredible bars and posting them to me and reimburse him. He happily accepted this assignment and, through the power of today's technology, he included me in the shopping experience by sending various images of the inside the store. We also exchanged a few phone calls through Viber.

There was an offer of 6 bars for the price of 5, so he bought the Effie and Katniss bars from their "Hunger Games Catching Fire" collection and the Matcha Green Tea, Reishi Mushroom & Walnut, Açai & Goldenberry, and Coconut Ash & Banana bars from their "Super Dark" collection. This came to a total of $37.50 which was expensive but I felt that it was worth it. He posted them and told me that it cost a whopping $52.50! I was shocked but it was too late to go back by then. I transferred the money - $90 for six 85g chocolate bars! This was painful, but I managed to justify it to myself because I have been lucky enough to receive many free chocolate samples throughout my career.

 The Effie Bar

Of course, the Effie Trinket bar had to contain pink and purple! I was a little unsure about combining dark chocolate with the subtle flavours of strawberry and violet but it works surprisingly well and the dark chocolate does not overpower the other flavours. There are subtle hints of both as one chews through the delicious dark chocolate. Effie would be proud! I would say, however, that the packaging could be a little more exciting and include a photo or, even better, an illustration of the character.
 
The Katniss Bar

This is the one that I was most excited about and I was not disappointed! The creaminess of the milk chocolate was a perfect match for the salty and smoky chunks of bacon. It was great to have something to chew on rather than just have the flavour running through the chocolate. I love the idea of putting pork and apple in a chocolate bar – I’m sure that wild turkey, squirrel or rabbit wouldn’t have gone down as well (for those of you who haven't read the Hunger Games, Katniss frequently hunted these animals)! Like every form of dried apple which I have tried in my experience, it softened and got a little stuck in the teeth on consumption. I assume that this is unavoidable, however, I would prefer more apple flavour in the bar as it was minimal. Again, I think that the packaging could be more exciting with an illustration of Katniss on the front rather than one block of colour.

 The Super Dark Matcha Green Tea, Spirulina and Cocoa Nib Bar

Although I’m not the greatest fan of green tea, Vosges have really hit the nail on the head with this bar. The balance of green tea flavour with the dark chocolate works really well and the bar is enhanced by a crunchy texture from the cacao nibs. Spirulina isn’t particularly tasty, so it’s great that I can’t detect this flavour in the bar (I think that the main reason for its presence is for the “super food” properties). I think the packaging is stunning!

The Super Dark Reishi Mushroom and Walnut Bar 


I was really excited to try this one, too. I love the idea of mixing savoury with sweet. I tried a cocktail with truffle flavour recently and adored it! I was really looking forward to tasting mushroom with chocolate but, to my disappointment, I couldn’t detect any mushroom flavour at all. I admit that I wasn’t entirely sure what to look for with the Reishi mushroom flavour. I could sense a subtle savoury note, but, ultimately, all I could taste was the dark chocolate with some walnut notes. Nonetheless, the bar was delicious. The dark chocolate was very smooth and flavoursome and the walnuts gave a wonderful nutty and earthy flavour and texture. If it were just a “walnut and dark chocolate bar”, I’d give it 10 out of 10, but it isn’t. I would deduct 3 for the total lack of mushroom flavour. I do like the packaging but I would prefer some walnuts on there, too.

The Super Dark Coconut Ash and Banana Bar 

Since the packaging states "Sri Lankan coconut" as well as "charcoal coconut ash" and has images of coconut pieces as well as ash, one would assume that this bar contained coconut. Upon trying the bar, banana was all I could taste with the dark chocolate. I checked the ingredients list and it read coconut ash and no other form of coconut. I think that, although I find the packaging very artistic and eye-catching, it is also a little deceiving. Like the spirulina, I think that the coconut ash is there purely for the "super food" properties. I did enjoy the subtle, natural banana flavour in this bar, but I would have preferred a little coconut flavour and texture.


The Super Dark Açai and Goldenberry Bar

I admit that I’m not familiar with the flavour of açai but I expected it to be quite tart, like the physalis. I was pleasantly surprised how much I enjoyed the acidity of the fruits with the bitter dark chocolate. The flavours work really well together and give the bar a refreshing zing, different from that of citrus. I think that the packaging is very attractive along with the rest of the collection.

 I'm fascinated by many of the products from Vosges and wish that I could try them all. I hope that they expand their business to the UK at some point. I have added these bars to my mini "Chocolate Library" which I keep in a shoebox. I look forward to expanding my collection as I discover more exciting chocolate bars!

Sunday, 2 March 2014

Rabot 1745 - Borough Market, London

Dear readers,

The day after I got back from Costa Rica I visited the new Hotel Chocolat restaurant in Borough Market - Rabot 1745. It was the perfect way to complete my holiday and catch up with friends, over more chocolate! Every dish contains cacao (roasted cocoa beans) in some form or other. Apparently cacao has been used in savoury cuisine far longer that it has with confectionery. I already knew that chocolate can be very versatile, but I was keen to see how cacao works in savoury dishes too.

We started the meal with a cacao bean tasting. The beans were from Vietnam and tasted quite different from those that I had been eating for the previous couple of weeks at La Iguana. I happened to have some of my roasted beans from La Iguana in my bag and it was great to be able to compare them.


After my experience with the delicious flavours of the fresh cacao pulp at La Iguana, there was no contest when it came to deciding which drink to order; the Fresh Cacao Bellini. The taste wasn't the same as that of the exotic mangosteen flavour that I experienced in Costa Rica but it was still delicious, especially with the bubbles! Apparently different varieties of cacao pods have different exotic fruit flavours in the pulp such as mango; I can't wait to try some more!


We were offered a complementary amuse-bouche of butternut squash soup served with cacao buttered and nibbed bread. This was a lovely surprise and great way to warm up the palate.

For my starter I chose the Scallop Salad.  This included Seared Scottish scallops, beet carpaccio, apple-beet matchsticks, wintercress leaves, curried nib oil and a horseradish white chocolate condiment. This was a great collection of flavours and textures.

For my main I ordered the Creole Monkfish. This dish consisted of Cacao-creole spiced Cornish monkfish, roasted and served with caramelised fennel and artichoke, winter greens and Marcona almond purée. This was another intriguing collection of textures and flavours; beautifully cooked monkfish with a variety of spices and the smooth almond paste. I mopped up every last residue!


For dessert, I ordered the Coconut Milk and Rum Panna Cotta. This was served with a fresh papaya and mango salsa and a small cacao-nibbed biscuit. There was a subtle warmth from the rum and the creamy flavours of the rum and coconut melted over the tongue with each spoonful. This was delectable, as I'd hoped it would be!

I ended the meal with a Saint Lucian Hot Chocolate. I thoroughly enjoyed the meal at Rabot 1745. The service was faultless - we were attended to our every need yet we never felt hassled. I can't wait to return and try some of the other dishes (and drinks)!

Thursday, 28 November 2013

Blue Cheese Brownies

Dear readers,

There have been some interesting developments in brownie recipes recently; the latest trend being the addition of marmite. I remembered one Chemistry lesson when I was in college and we watched a clip of Heston Blumenthal making a chocolate fondant with blue cheese. Until I made these brownies, I'd never tasted chocolate and blue cheese together before. I searched the internet and couldn't find any existing brownie recipes with blue cheese. I did, however, come across a blue cheese truffle recipe.

I am no expert on blue cheese but I chose to use gorgonzola because I love the pungency and tanginess of it. I also love the sound of the word gorgonzola! However, I am sure that this recipe would work well with any type of blue cheese. I used the same base recipe as I did for my Salted and Spiced Dulce de Leche Brownies.


Blue Cheese Brownies
200g good quality dark chocolate
200g butter
100g blue cheese
250g caster sugar
3 medium eggs
125g plain flour

Melt the chocolate, cheese and butter in a bowl over a pan of hot water and set aside to cool slightly.
Whisk the eggs with the sugar and mix with the cooled chocolate, cheese and butter. Sieve and stir in the cocoa and flour. Pour the mixture into a greased and lined baking tray. Bake for 25 minutes at 190°C. Slice once cooled.
Notes:
I cooked these brownies for 30 minutes and they turned out a little dry, so I have reduced the baking time to 25 minutes in this recipe.


I found these brownies truly fascinating! The gorgonzola flavour was very subtle but added a deep, tangy complexity of flavours which came through near the end of each bite. I was very impressed and surprised at how delicious they were; I was half expecting them to turn out to be inedible! This recipe seems to achieve the perfect balance - if there were any more cheese I think that they would taste unpleasant.


I took these brownies into work (I work with a number of Food Scientists) and, as an experiment, I asked my colleagues to sample the brownies to see if they could guess the secret ingredient. It was great fun! Some suggested marmite, a few suggested stock cubes and one colleague even suggested green tea! A few picked up on the cheesy notes, however, only one person guessed the secret ingredient correctly (after a struggle!). In fact, they were from the Sensory department and have been working in Food Sensory Science for over 15 years! So, perhaps their correct conclusion doesn't count, since they are trained for this exact type of research!


In conclusion, these brownies caused quite a stir (to say the least!) and I now have my colleagues asking me if I will be continuing this "Monday Taster Challenge". I thoroughly recommend to anyone interested to have a go at making them, even if it is just to see people strive to guess the secret ingredient! I wonder if these actually have been made before, I find it difficult to believe that they haven't. I also wonder if blue cheese brownies will be the next flavour trend after the 'Marmite Brownies'. We shall see...

Saturday, 30 March 2013

Breakfast Flapjack

Dear readers,

I've always found it difficult finding time to eat breakfast in the mornings. Even though food is so important to me, I can't resist those extra few minutes in bed!

If I did manage to make time the mornings, I would choose to eat porridge every day for breakfast. I believe that oats are such a healthy food. I've noticed that supermarkets are now selling instant porridge pots, but at £1.00 a pot, I decided that eating those everyday would be far too expensive! I then found myself buying flapjack at work for breakfast. Again, this was too expensive in the long term, and a little unhealthy, too, with all that sugar and butter. Then I remembered reading about banana flapjacks by Choclette. I decided that substituting some of the butter and sugar with bananas would make the flapjacks that little bit healthier, which would make it appropriate to eat them everyday for breakfast, right?! I also thought that I'd pack some extra nutrients from other ingredients in there, too, for that extra boost in the morning.

This recipe is adapted from Chocolate Log Blog

Breakfast Flapjacks
2 ripe bananas, mashed
200g rolled oats
60g soft brown sugar
30g golden syrup
125g butter
80g dried cranberries
50g desiccated coconut
50g chopped dark chocolate
50g chopped pecans
25g pumpkin seeds

Mash the bananas in a large bowl with a fork. Add the butter, sugar and syrup and microwave for 30 seconds or so, to melt the butter. Mix well, then add the cranberries, coconut, chocolate, pecans and seeds, or whatever inclusions one wishes to add, then stir in the oats. Press the mixture into a greased baking tray and bake at 180°C for 30 minutes, or until it is golden brown. Allow to cool before slicing into squares.

These certainly make a good 'on-the-go' breakfast for my commute to work, without my feeling too guilty! The only problem is that they go down rather quickly. It may be worth making a larger batch...

Wednesday, 19 December 2012

Salted Dulce de Leche & Mocha Cake Pops

Dear readers,

Firstly, I would like to apologise for my lack of posting last month. The recipe that I was working on had failed. However, I hope to perfect it and post it on the blog in the near future!

Now let's talk about these cake pops. It was my birthday recently and I decided to make some cake pops for my friends to make a change from a normal birthday cake. These aren't the most innovative of flavour combinations (salted mocha caramel cake pops already exist!) but I wanted to make something that all of my friends would like. Rather unsurprisingly, I couldn't resist using the decadent dulce de leche again - it's just so good!


I decided to use my chocolate tempering skills that I acquired from the Chocolate Confectionery Training Course at work (I have been working at Leatherhead Food Research since July 2012) to temper some chocolate for the pops, rather than go for a chocolate coating which seems to be a popular choice in many recipes. Tempering chocolate is quite a work out!


Salted Dulce de Leche & Mocha Cake Pops
To make ~15 cake pops
100g self raising flour
100g sugar
2 large eggs
100g butter
1 tablespoon instant coffee dissolved in 2 tablespoons of hot water
1 tablespoon cocoa
200g dulce de leche
300g dark chocolate or chocolate coating
1 teaspoon sea salt
15 lollipop sticks

Cream the butter and sugar together then add the self raising flour, eggs, prepared coffee and cocoa and whisk until well incorporated. Spoon the mixture into a greased and lined cake tin and bake at 180°C for 25 minutes. Allow to cool.

Break the cake into chunks and place in the food processor to form fine crumbs. Add 90g of the dulce de leche to the crumbs in the food processor and mix for a few more seconds until a dough forms.

Make ~25g balls from the cake and dulce de leche 'dough' mixture. Using the lollipop sticks, prick half way into each ball to prepare for the 'gluing' of the sticks to the balls and place onto greaseproof paper with the lollipop stick holes facing upwards.

Melt 100g of the dark chocolate in a small narrow cup. Dip the lollipop sticks into the dark chocolate and then place into the holes in the balls. Place in the freezer for 30 minutes.

Remove the cake pops from the freezer. Temper the remaining chocolate (or melt the chocolate coating) and cover the cake pops with the chocolate by submerging them until ~5mm of the stick is covered, then quickly and carefully turn them so that there is an even layer of chocolate on the surface. The chocolate will cool very quickly.
It takes a little bit of practice. Place the coated cake pop in styrofoam (or an unsliced loaf of bread, as I used!). Repeat until all pops have been coated and allow to cool and set.

Gently warm the remaining 110g of dulce de leche in the microwave 20 seconds at a time, stirring frequently until it has a smooth consistency. Be careful because it burns easily. Pour the warmed dulce de leche into a piping bag and drizzle over the top of the cake pops. Add a sprinkle of sea salt and serve!

Notes:
If one wishes to prepare the uncoated cake pops the night before and store them in the freezer overnight, be sure to remove the pops from the freezer about 25 minutes before coating them to avoid cracking of the chocolate.

Be gentle when putting the sticks into the cake balls as they, also, are very susceptible to cracking!
Chocolate tempering is quite tedious. Temperature probes are essential. The seeding method is probably the easiest method to carry out at home. Please have a browse on the internet for different methods. I decided to use real chocolate because I wanted to test my tempering skills, so if you're feeling brave then please give it a try! If not, chocolate coating works perfectly and is much easier to use because it doesn't require tempering.

The cake pops went down well with my friends and colleagues. However, some people commented that the mocha flavour did not come through. This may be due to the powerful flavours of the dark chocolate, so one could use coffee frosting instead of dulce de leche to 'glue' the cake crumbs together to increase the mocha flavour.

Happy cake-popping!

Tuesday, 30 October 2012

Snouts - Homemade Bacon Marshmallows Dipped in Milk Chocolate

Dear readers,

I'm not a huge marshmallow fan. When I was a child I used to toast marshmallows on the fire in the living room. My favourite marshmallows were those covered in granulated sugar because, when they were toasted, the sugar melted into a crispy shell which encased the soft molten marshmallow - they had such a wonderful light crunch with a gooey centre, unlike those covered in corn flour which just burned on the outside! I find most commercial marshmallows generally quite chewy and unpleasant. I heard, however, that homemade marshmallows are quite different from the commercial ones. Also, I thought that it would be fun to make marshmallows at home!

When I was in Year 7 (at school), many years ago, we had a media project where we had to design a product and create some adverts for it. I made some "scent bags" with a couple of my friends (I was very 'attached' to the sewing machine at that age) and some of my friends in my class made a food product - snouts! As far as I can remember, these snouts were coated in chocolate and had a pair of nostrils to represent a pig snout. I decided to use that memory of my friend's snouts to influence my homemade marshmallows to surprise him.


Bacon seems to be in everything in America. Burgers, pancakes, chocolate, brownies, cookies, lollipops... and even marshmallows! I always like to make things interesting and I thought that bacon marshmallows would be very apt for making snouts! Most of the people with whom I discussed my idea of bacon marshmallows were a little horrified. This didn't put me off of making them (they already exist anyway!) but it did scare me off of putting too much bacon in them. This resulted in a final product with only a few tiny pieces of bacon in each snout, which meant that most people wouldn't even know that the bacon was there, unless I told them. So I am a little disappointed with the outcome in that respect. Next time I will definitely use more bacon, and try not to be afraid of adding too much!

Homemade marshmallows really are very different from the commercial ones - they are so light and airy, like little clouds (the Spanish actually call marshmallows "nubes", which literally means 'clouds') that go "poof!" in your mouth and disappear before your second chew! They are also very easy to make (unlike macarons!). I can't wait to try out a different flavour soon!

This recipe is adapted from David Lebovitz.
Snouts
9g powdered gelatine (1 sachet)
60ml + 40ml water
100g sugar (caster or granulated)
50g liquid glucose
2 large egg whites at room temperature
A pinch of salt
A few drops of red food colouring
2 rashers of crispy bacon, finely chopped
100g milk chocolate
Marshmallow mix (70g icing sugar mixed with 70g corn flour, sieved)

This recipe makes ~24 snouts.
Put the gelatine and 60ml cold water in a small bowl to soften.

In a small saucepan with a sugar thermometer add the 40ml cold water, the sugar and liquid glucose and place over a medium heat.

In a clean bowl whisk the egg whites until they are soft and fluffy. Add the pinch of salt.

Once the sugar mix reaches a temperature of 220
°F, beat the eggs until they become stiff. When the sugar mix reaches 245°F, slowly pour it over the whipped egg whites and continue whisking.

Put the gelatine and water mix into the saucepan and allow it to melt with the remaining heat from the sugar mix. Whilst whipping, pour the liquefied gelatine into the egg whites and sugar. Add the food colouring and continue whisking until the mixture and the bowl has completely cooled. Gently fold in the crispy bacon pieces.

Generously dust a round cake tin with the marshmallow mix and lightly grease the edges of the tin with vegetable oil.

Spoon the cooled marshmallow into the cake tin and allow to set uncovered for a minimum of 4 hours, but preferably overnight.

Once the marshmallow has set, use a 1 inch diameter cookie cutter to cut out individual marshmallows. Roll in the marshmallow mix and dust away any excess.

Slowly melt the chocolate in a bowl over a saucepan of hot water on a low heat. Dip the bottom of the marshmallows in the melted chocolate and place on greaseproof paper. Use the end of a fork to dot on the two nostrils of the snout on the top of the marshmallow. Allow the chocolate to cool and serve!

Notes:
The complete cooling of the marshmallow during the final whip is crucial - if the marshmallow hasn't fully cooled before placing into the mould, it will weep after it has set.


Unfortunately, I was afraid of adding too much bacon in these marshmallows which, as I mentioned above, has resulted in a marshmallow with too little bacon flavour and texture.

My friend, for whom I made these marshmallows, was overjoyed with my re-creation of the snouts. He agreed that the marshmallows were very light and fluffy. He enjoyed the bacon but also agreed that the bacon flavour could be made stronger.


Oink!

Tuesday, 31 July 2012

Mayan Chocolate Truffles

Dear readers,

Early last year during my Study Abroad Exchange at UC Davis, California, I visited Mexico during my "Spring Break". I went on a day trip to Chichen Itza and bought some real Mayan Chocolates (unfortunately, I don't have a photo of them). They were quite dry and crumbly but the flavours were delicious - dark and spicy. I tasted black pepper, chilli, cinnamon, bitterness from the cocoa and a slight sweetness of honey.

I really enjoyed these flavours so I decided to create my own version of these chocolates. I wanted to keep the same flavours - black pepper, chilli and cinnamon, but I wanted the chocolates to have a smooth, melt-in-the-mouth texture, rather than dry and crumbly. Fortunately, a very simple ganache of chocolate and cream makes wonderful melt-in-the-mouth truffles.

As I have mentioned before, I prefer my sweets to be on the bitter side. My father and I enjoy the creaminess in milk chocolate but not the sweetness from the added sugar. Also, we both love the deep bitterness of high-cocoa content chocolates but, unfortunately, there doesn't seem to be a creamy chocolate available with high cocoa and low sugar. Most creamy chocolates  have even more added sugar! So, I find that these truffles perfectly suit my taste - just cream and blissful dark bitter chocolate, with a few added spices to mimic the wonderful flavours that I discovered in those Mayan chocolates.


Mayan Chocolate Truffles
200g 80% dark chocolate
300ml double cream
2 teaspoons cayenne pepper
teaspoons cinnamon (or mixed spice)
2 teaspoons freshly ground black pepper
50g cocoa for dusting

This recipe makes approximately 60 truffles.

Break up the chocolate and place in a heat-proof bowl. Slowly heat the cream in a saucepan until it starts to bubble. Remove the cream from the heat, pour over the chocolate and stir until all of the chocolate has melted. Mix in the spices and pour the mixture into a cling-film lined bowl. Allow to cool for 3 hours. Once cooled, use a spoon to cut out some of the truffle mixture and roughly shape into a ball using your hands. Roll the ball in cocoa. Repeat with the rest of the truffle mixture and serve. Store the truffles in the fridge for up to one 1 week.
Notes:
These are quite hot - the odd one or two are enough to satisfy! So, please reduce the amount of cayenne pepper if one prefers less heat. I chose the rustic look of the rough ball-shaped truffles, as they look similar to the Mexican chocolates. If you look closely, you can see that I also mixed some edible bronze lustre with the cocoa to give the truffles a little sparkle!


I have also included a couple of my favourite photos from my trip to Mexico - it is a truly beautiful place!


Tuesday, 3 April 2012

El Submarino

Dear readers,

I am back in the southern hemisphere experiencing pleasant autumnal sunshine, similar to that of a good day in the British summer.

Submarino is a popular beverage that appears on the menu of every café that sits on every corner of Buenos Aires. Submarino simply translates to English as "submarine". The simple name is perfect for such a beverage as it consists purely of hot milk and a piece of dark chocolate, which is sometimes shaped into a submarine. One submerges the chocolate into the hot milk and stirs as the chocolate melts and mixes with the milk to form an Argentine version of hot chocolate.

During my trip last December, I never sampled the Submarino due to the extreme heat and humidity. However, as the season has entered early autumn, the weather is becoming cooler. South of the capital, at a beach town called Pinamar, the windy coastline provides the perfect setting to sample this beverage.

Despite my love for dark chocolate, I was disappointed with this drink. I think that the name and the idea of creating the hot chocolate at the table are more interesting than the drink itself. Perhaps the milk wasn't hot enough to create a smooth consistency, or maybe there was too much milk for the small piece of chocolate. It was lost. The chocolate merely provided a grainy mouth-feel to the milk. I am surprised that such a simple drink, without the addition of sugar, is so abundant on the menus of a country with such a sweet tooth!

However much my palate prefers less-sweet desserts, I can't help but imagine that this drink would be better with the addition of a little something sweet, such as honey, sugar or even dulce de leche, or, maybe, all it needs is a little more chocolate...

Thursday, 9 February 2012

Chocolate Argentine Alfajores for Valentine's Day

Dear readers,

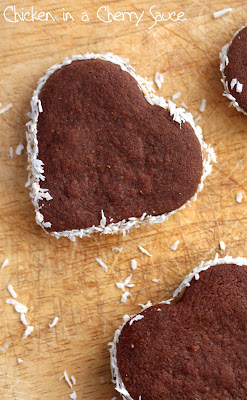
I wanted to make a tasty treat to post to my boyfriend (in Argentina) for Valentine's Day. I posted him some of the Argentine Thumbprint Cookies that I made back in October and he absolutely loved them, as well as the idea of them being homemade and travelling so far. I decided that the Valentine's treat had to be heart-shaped and it had to be something small and light for the post. The Argentine Thumbprint Cookies were adapted from the traditional Argentine Alfajores (shortbread cookies sandwiched with dulce de leche and dusted with desiccated coconut), so I decided to make a Valentine's version of alfajores!

I used the same recipe for the shortbread that I used for the Argentine Thumbprint Cookies (55g sugar creamed with 125g of butter with 180g plain flour), but substituted 20g of the flour for some cocoa powder to make them dark and chocolately. Shortbread is so simple to make and so delicious that is has become a favourite of mine!

I rolled the shortbread dough (I ended up using an empty wine bottle as this student house seems to be a lacking rolling pin, as well as nutmeg, which I mentioned in my previous post!) and used a heart-shaped pastry cutter to cut out some hearts that were around 3mm thick. I then baked them at 180°C for around 10-12 minutes. After they had cooled, I sandwiched them with dulce de leche and rolled the edges in desiccated coconut.

I can only hope that they make it safely through the post and arrive on time!