Showing posts with label dulce de leche. Show all posts

Wednesday, 19 December 2012

Salted Dulce de Leche & Mocha Cake Pops

Dear readers,

Firstly, I would like to apologise for my lack of posting last month. The recipe that I was working on had failed. However, I hope to perfect it and post it on the blog in the near future!

Now let's talk about these cake pops. It was my birthday recently and I decided to make some cake pops for my friends to make a change from a normal birthday cake. These aren't the most innovative of flavour combinations (salted mocha caramel cake pops already exist!) but I wanted to make something that all of my friends would like. Rather unsurprisingly, I couldn't resist using the decadent dulce de leche again - it's just so good!


I decided to use my chocolate tempering skills that I acquired from the Chocolate Confectionery Training Course at work (I have been working at Leatherhead Food Research since July 2012) to temper some chocolate for the pops, rather than go for a chocolate coating which seems to be a popular choice in many recipes. Tempering chocolate is quite a work out!


Salted Dulce de Leche & Mocha Cake Pops
To make ~15 cake pops
100g self raising flour
100g sugar
2 large eggs
100g butter
1 tablespoon instant coffee dissolved in 2 tablespoons of hot water
1 tablespoon cocoa
200g dulce de leche
300g dark chocolate or chocolate coating
1 teaspoon sea salt
15 lollipop sticks

Cream the butter and sugar together then add the self raising flour, eggs, prepared coffee and cocoa and whisk until well incorporated. Spoon the mixture into a greased and lined cake tin and bake at 180°C for 25 minutes. Allow to cool.

Break the cake into chunks and place in the food processor to form fine crumbs. Add 90g of the dulce de leche to the crumbs in the food processor and mix for a few more seconds until a dough forms.

Make ~25g balls from the cake and dulce de leche 'dough' mixture. Using the lollipop sticks, prick half way into each ball to prepare for the 'gluing' of the sticks to the balls and place onto greaseproof paper with the lollipop stick holes facing upwards.

Melt 100g of the dark chocolate in a small narrow cup. Dip the lollipop sticks into the dark chocolate and then place into the holes in the balls. Place in the freezer for 30 minutes.

Remove the cake pops from the freezer. Temper the remaining chocolate (or melt the chocolate coating) and cover the cake pops with the chocolate by submerging them until ~5mm of the stick is covered, then quickly and carefully turn them so that there is an even layer of chocolate on the surface. The chocolate will cool very quickly.
It takes a little bit of practice. Place the coated cake pop in styrofoam (or an unsliced loaf of bread, as I used!). Repeat until all pops have been coated and allow to cool and set.

Gently warm the remaining 110g of dulce de leche in the microwave 20 seconds at a time, stirring frequently until it has a smooth consistency. Be careful because it burns easily. Pour the warmed dulce de leche into a piping bag and drizzle over the top of the cake pops. Add a sprinkle of sea salt and serve!

Notes:
If one wishes to prepare the uncoated cake pops the night before and store them in the freezer overnight, be sure to remove the pops from the freezer about 25 minutes before coating them to avoid cracking of the chocolate.

Be gentle when putting the sticks into the cake balls as they, also, are very susceptible to cracking!
Chocolate tempering is quite tedious. Temperature probes are essential. The seeding method is probably the easiest method to carry out at home. Please have a browse on the internet for different methods. I decided to use real chocolate because I wanted to test my tempering skills, so if you're feeling brave then please give it a try! If not, chocolate coating works perfectly and is much easier to use because it doesn't require tempering.

The cake pops went down well with my friends and colleagues. However, some people commented that the mocha flavour did not come through. This may be due to the powerful flavours of the dark chocolate, so one could use coffee frosting instead of dulce de leche to 'glue' the cake crumbs together to increase the mocha flavour.

Happy cake-popping!

Tuesday, 12 June 2012

Torta Rogel


Dear readers,

Torta Rogel is an authentic Argentine recipe. It consists of layers of crispy pastry sandwiched between glossy dulce de leche and is topped with Swiss meringue.

When I was in Argentina I made this cake with one of my Argentine friends. She gave me a 1kg pot of dulce de leche to take home to make this dessert for my English friends and family.

Many people make Torta Rogel using the same dough as empanadas or they use pre-made empanada discs that I mentioned in my Empanada post. This is such a simple dessert that I didn't want to take any shortcuts. I don't think that England sells empanada discs, anyway! I researched many different recipes, in both Spanish and English, and combined them to create my own.


Torta Rogel

Pastry
4 egg yolks
260g plain flour
100g butter
50ml water

Filling
400g dulce de leche

Swiss meringue

4 egg whites
100g icing sugar

Mix the butter and flour together until a breadcrumb-like texture is formed. Add the egg yolks and water and mix to form a dough. Divide the dough into walnut-sized balls, wrap them in cling-film and then leave them to rest in the fridge for 1 hour.

Roll out the dough balls on a floured surface to a thickness of ~0.5mm. Place the sheets on a baking tray and prick the pastry all over with a fork. Bake the sheets at 180
°C for ~5 minutes until they are lightly golden brown.

Sandwich 7 or 8 baked pastry sheets with spoonfuls of dulce de leche. It may be useful to heat the dulce de leche slightly to soften it and make it easier to spread.

Lightly whisk the sugar and egg whites over a low heat. As the mixture warms, whisk harder until stiff peaks are formed. Place the meringue into a piping bag and pipe little peaks of meringue on the top pastry sheet.


Notes:

This recipe makes 38 walnut-sized dough balls which, in turn, makes 5 cakes. I decided to make 1 cake and several "rogelitos" (mini-cakes) by dividing each pastry ball into 5 smaller balls to make smaller pastry sheets. If one wishes to make one cake, I recommend quartering this recipe.

Although this recipe is simple, the rolling out of the pastry sheets and cooking them tray by tray does take some time. These are best eaten fresh, however, they can be stored for a few days and heated up for a few minutes in the oven before serving.

En Español:
Torta Rogel

Masa
4 yemas
260g harina
100g manteca
50ml agua

Relleno
400g dulce de leche

Merengue suizo

4 claras
100g azúcar impalpable

Mezclar la manteca y la harina juntos hasta conseguir una textura como de miga de pan se forma. A
ñadir las yemas y el agua y mezclar hasta formar una masa. Separar la masa en bolas del tamaño de una nuez, envolverlas en film transparente y dejar a descansar en la heladera durante 1 hora.

Estirar entonces las bolas de masa sobre una superficie enharinada hasta un espesor de 0,5mm. Colocar las hojas en una bandeja de horno y se pincha la masa por todas partes con un tenedor. Hornear las hojas a 180°C durante aproximadamente 5 minutos hasta que estén ligeramente doradas.

Intercalar las hojas con cucharadas de dulce de leche.

Batir las claras y el azúcar impalpable suavemente calentando en fuego bajo. Cuando esté caliente, batir mas fuerte hasta que este dura a punto de merengue. Rellenar una manga de decoración con el merengue y formar picos encima de las hojas con dulce de leche.

Notas:
Esta receta hace 38 bolas de masa, que hacen 5 tortas.
Me decidí a hacer una torta y varios "rogelitos", dividiendo cada bola en 5 bolas más pequeñas para hacer pequeñas hojas.

Aunque esta receta es simple, el estirar y cocinar de las hojas requiere mucho tiempo. Estas tortas se comen mejor frescas, sin embargo, pueden almacenar durante unos pocos dias y se calientan durante unos pocos minutos en el horno antes de servir.

The pastry is very crumbly and delicate. The idea is for the pastry to crack as one adds the layers together and the sticky dulce de leche to act as a glue holding each layer in place.

The Swiss meringue is quite different from normal meringue since it holds a mousse-like texture. If one prefers, the meringue can be hardened on a low heat in the oven for 30 minutes or so. The cakes will survive a low temperature in the oven.

Slice like a normal cake and enjoy!


Thursday, 9 February 2012

Chocolate Argentine Alfajores for Valentine's Day

Dear readers,

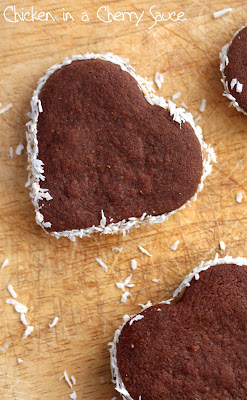
I wanted to make a tasty treat to post to my boyfriend (in Argentina) for Valentine's Day. I posted him some of the Argentine Thumbprint Cookies that I made back in October and he absolutely loved them, as well as the idea of them being homemade and travelling so far. I decided that the Valentine's treat had to be heart-shaped and it had to be something small and light for the post. The Argentine Thumbprint Cookies were adapted from the traditional Argentine Alfajores (shortbread cookies sandwiched with dulce de leche and dusted with desiccated coconut), so I decided to make a Valentine's version of alfajores!

I used the same recipe for the shortbread that I used for the Argentine Thumbprint Cookies (55g sugar creamed with 125g of butter with 180g plain flour), but substituted 20g of the flour for some cocoa powder to make them dark and chocolately. Shortbread is so simple to make and so delicious that is has become a favourite of mine!

I rolled the shortbread dough (I ended up using an empty wine bottle as this student house seems to be a lacking rolling pin, as well as nutmeg, which I mentioned in my previous post!) and used a heart-shaped pastry cutter to cut out some hearts that were around 3mm thick. I then baked them at 180°C for around 10-12 minutes. After they had cooled, I sandwiched them with dulce de leche and rolled the edges in desiccated coconut.

I can only hope that they make it safely through the post and arrive on time!

Tuesday, 10 January 2012

Argentine Yule Log

A cross-section of the Yule log

Dear readers,

Happy New Year! I apologise for posting this after Christmas, however, I know that there are a few people who celebrate Christmas later than others, for one reason or another. Also, my friends and I like to share a "Fake Christmas" some time early in the New Year. Therefore, this recipe may still be useful at this time of year!

When I was in Argentina, I really wanted to share something English at Christmas, and combine both the English and Argentine cultures in one dessert.

The outside of the Yule log

The idea came into my head... why not make a chocolate Yule log, but use dulce de leche as the filling in order to make it Argentine?!

So, my boyfriend and I went ahead and baked a Yule log. We really struggled to find cocoa in the shops of Buenos Aires, and so decided to keep the sponge coffee flavoured. This worked well because the sickly-sweet dulce de leche was "calmed down" (slightly) by the bitterness of the coffee. We also added coffee to the icing to make it truly mocha.

We used a standard Yule log recipe but substituted the cocoa in the sponge for some instant coffee, and used the filling of dulce de leche and a mocha butter icing. We didn't have the best cooking tray for the sponge so it ended up slightly squidgy and slightly burnt, too. Fortunately, although it sank a little, the dulce de leche covered up any burnt flavours and we didn't receive any complaints!

Dulce de leche oozing out of a slice of the Yule log

We served this at the big dinner on Christmas Eve (Christmas is mainly celebrated on Christmas Eve in Argentina) and it was a great success! It was so well received that the family demanded more for the larger celebrations for New Year. We decided to create a double-sized Yule log (AKA a Yule tree) for the New Year Celebrations. I hope you all enjoyed the holidays!

Friday, 28 October 2011

Argentine Thumbprint Cookies

Argentine Thumbprint Cookie broken in half

Recently, I have become a keen drinker of Mate. Despite the fact that Mate suppresses the appetite, I always enjoy a sweet accompaniment, just as I do with my tea and coffee. Argentines are famous for their love of intense flavours and their love of dulce de leche, as I mentioned in a previous post. They drink their Mate very bitter. I drink Mate differently from the Latin Americans, with more water and much less yerba, in order to accommodate my sensitive palate.

Yerba Mate

I have always thought that 'thumbprint cookies' were cute. I had a browse on the internet and found that there are not many thumbprint cookies with dulce de leche. Argentine alfajores (which I sampled in Barcelona) generally consist of two shortbread cookies joined together with a filling of dulce de leche and dusted with desiccated coconut. I decided to transfer this idea into thumbprint cookies (as they are just adorable).

Argentine Thumbprint Cookies before cooking

I followed a shortbread recipe that I found on the internet which called for equal parts of butter and flour. The dough felt extremely oily so I added in some more flour before I shaped the cookies. Unfortunately, the cookies turned out a lot bigger and less 'adorable' than I had anticipated/hoped for.

Argentine Thumbprint Cookies

I tried again and this time managed to burn them. They were still worthy of being eaten, but definitely not worthy for the blog.

Dulce de leche centre

So, I tried for a third time and finally I had success! I creamed 125g of butter with 55g of sugar. I then mixed in 180g of flour and shaped the dough into small balls. I coated the balls with desiccated coconut, placed them onto a baking tray and pushed my thumb into the centre to create 'bowls' for the dulce de leche. After baking them until they were golden brown (around 10 minutes at 180°C), I filled the thumbprints with dulce de leche and added an extra dusting of coconut. They were small, cute and very tasty.

Argentine Thumbprint Cookie

Is anyone else, out there, a Mate drinker?

Thursday, 2 September 2010

Speculoos Millionaire's shortbread

Here is another recipe using the divine spreadable biscuit. Please excuse my language, but holy crap these things taste amazing! The recipe here is very simple - shortbread base, a can of dulce de leche mixed with a jar of Speculoos spread and then a layer of your choice of chocolate.

I made half with milk chocolate and the other half with dark chocolate. In my opinion, the dark is by far the best. I have given out samples of these delicous chunks and had great feedback. If you have a jar of Speculoos lying around, I could not recommend a better way to use it! The dulce de leche marries so well with it. The Speculoos taste gives the treat a massive boost.

Yummmm!!!