Dear readers,
The first stage of my home chocolate production (after sourcing already-fermented beans) is roasting.
At La Iguana Chocolate, they roast their cacao beans in a pot over a fire and stir constantly for 10 to 20 minutes until they hear the beans "pop". I asked Jorge (the eldest son of the family) how I should roast the beans at home. I asked if I should use a frying pan and wait for the "pop" and he replied...
"yes, do add a little of water just to wet the bean no make a sopa OK, good luck".
Following Jorge's advice, I added a splash of water to the beans in the frying pan and turned the heat up high, stirring constantly. Once I started to hear the loud "pops", I turned the heat off and continued stirring the beans until the popping stopped (one has to be careful; they can move when they pop so it might be an idea to use a splash guard). The aroma that came from the beans was extraordinary! The whole house smelt of brownies. I went out and came back a few hours later and the whole house still smelt of brownies; it was incredible! I definitely recommend roasting a few cocoa beans before a house viewing instead of baking bread. I'm sure it will be much more effective!
I
recently attended the Food And Drink Expo in Birmingham and met Willie
Harcout-Cooze from Willie's Cacao. I spoke to him about roasting and he
said that I should not do it in a frying pan because the beans should not be exposed to direct heat. He recommended that I roast them in an oven on a
baking tray with some baking paper. However, at this point I had already
roasted most of my beans using Jorge's method. I will definitely try
roasting the beans in the oven next time!
Monday, 28 April 2014
Sunday, 13 April 2014
Chick Macarons with a Cherry Sauce - Happy 4th Birthday to my blog!
Dear readers,
Chicken in a Cherry Sauce has just turned four!
Thanks so much to you, my readers, who have supported this blog! I really enjoy being part of the online food blogging community; there are so many beautiful and inspirational blogs out there! I would like to give extra special thanks to those of you who regularly visit my blog despite my sometimes infrequent posting. I really appreciate your patience and loyalty!
To celebrate I decided to make some "Chicks with a Cherry Sauce" in the form of macarons sandwiched with cherry sauce. I thought that this would also fit quite well with Easter coming up! They didn't turn out quite as uniform as my Champagne Macarons (hence I haven't photographed many of them). However, this could be considered as a part of their character. I think that I got lucky with my success on the Champagne Macarons - these chick macarons took three attempts to get right! Clearly I have yet to master the art of making macarons.
I have been a little lazy with these and left the shell plain almond flavour with a very basic filling of cherry jam! Nonetheless, I think that these simple flavours go well together.
As with my Champagne Macarons, I used the same base recipe that I developed with my Kaffir Lime and Coconut Macarons.
Chick Macarons with a Cherry Sauce
45g egg white (preferably aged for 2 days at room temperature)
70g + 20g icing sugar
50g ground almonds
22g caster sugar
Yellow food colouring (powder or gel - the amount will vary depending on the type used)
Black icing
100g cherry jam
This recipe will make 16 macarons (32 shells).
Add a few drops of water and orange food colouring to create an icing dough. Roll it out and cut out small triangles for the beaks. Add a little more water to the leftover icing and use that to glue the beaks to half of the macaron shells. Finish the decoration using black icing for the eyes.
Sandwich the chick face shells and the plain shells together with cherry jam.
Notes:
Do not use gel icing for the eyes! I had just finished decorating them on a Sunday evening when it started to get dark and the eyes were still wet so I left them to dry. A week later, the eyes were still wet. So I had to be quite careful in handling them so that I didn't smudge the eyes and cover the macarons with black icing!
I did research Chick Macarons before I made mine and found some beautiful and adorable creations. I particularly like these that were made by Raspberri Cupcakes. As one may see, I found the photographs inspiring!
Watch out... the chicks might lay a Cadbury's Mini Egg while you're not looking...
Wednesday, 2 April 2014
The Chocolate Challenge - Processing Chocolate from Bean to Bar at Home
Having been inspired by the improvisation at La Iguana and my desire for understanding the chocolate production process, I have decided to attempt the processing of my own chocolate at home from bean to bar. Sadly, I don't have access to fresh cacao beans here in England. Therefore, I will have to omit the first few steps (the harvesting, fermenting and drying of the beans). Unfortunately, I do not have enough beans from La Iguana to carry out this challenge; so I have bought a separate 1kg batch of fermented, unroasted Criollo beans from South America. The remaining steps I intend to carry out to process a ~70% cacao dark chocolate bar will include:
1. Roasting
This should be one of the most straightforward stages. There are two main techniques which I can carry out at home for this step without having access to specialist equipment.
2. Winnowing
This is, effectively, the removal of the shells of the cacao beans once they have been roasted. There are, again, two main techniques for this method which should be feasible at home.
3. Refining
This is the first step that will be quite challenging since it will require specialist equipment. The size of the cacao particles will need to be below 20 microns in size in order for them to be undetectable by the tongue. It will be difficult to track down a refiner which I can use at home to get the particles to this size!
4. Conching
Once I have refined the cacao and added the sugar, the chocolate then needs to go through the conching process. I anticipate that this will be the most difficult stage of the home chocolate processing. It involves the churning of the chocolate at a continuous speed and elevated temperature for a minimum of 12 hours. I have doubts about my ability to complete this stage!
5. Tempering
I have already tempered chocolate, but not at home. There are three techniques for tempering; the marble method, the seeding method and the water bowl method. If I manage to track down a slab of marble, then I will attempt marble tempering!
6. Moulding
This should be simple enough, however, it depends on how I wish my chocolate to be moulded. This will involve either searching for a suitable mould or trying to create one myself.
Before I carry out any of the processes, I plan to read about home chocolate processing as much as possible. I, of course, expect to come across plenty of bumps along the way but this is all part of the learning process. I can only hope that I will manage to overcome these obstacles so that I can complete the challenge and taste my own homemade chocolate!

If anyone has any advice or ideas then please do share them!
Thursday, 13 March 2014
Vosges Haut Chocolat Chocolate Bar Review
Dear readers,
I first discovered Vosges Haut Chocolat when I came across Mo's Dark Bacon Bar in a local supermarket in Davis, California. At work, I have been co-writing an article about innovative new confectionery products for Kennedy's Confection Magazine each month. During my searches I came across Vosges again and I have fallen in love! Some of their bars sounded really interesting and unusual and nothing like I had tried before.
I decided that I had to try some of them. I checked the cost of international shipping and was quite shocked to find that it was $75! When I used to live in California and posted things to friends at home it cost around $20. I have a friend who lives in Los Angeles so I asked him if he could do me a huge favour by going to a Vosges Haut Chocolat store in Beverly Hills, buying me some of these incredible bars and posting them to me and reimburse him. He happily accepted this assignment and, through the power of today's technology, he included me in the shopping experience by sending various images of the inside the store. We also exchanged a few phone calls through Viber.
There was an offer of 6 bars for the price of 5, so he bought the Effie and Katniss bars from their "Hunger Games Catching Fire" collection and the Matcha Green Tea, Reishi Mushroom & Walnut, Açai & Goldenberry, and Coconut Ash & Banana bars from their "Super Dark" collection. This came to a total of $37.50 which was expensive but I felt that it was worth it. He posted them and told me that it cost a whopping $52.50! I was shocked but it was too late to go back by then. I transferred the money - $90 for six 85g chocolate bars! This was painful, but I managed to justify it to myself because I have been lucky enough to receive many free chocolate samples throughout my career.
I was really excited to try this one, too. I love the idea of mixing
savoury with sweet. I tried a cocktail with truffle flavour recently and
adored it! I was really looking forward to tasting mushroom with
chocolate but, to my disappointment, I couldn’t detect any mushroom
flavour at all. I admit that I wasn’t entirely sure what to look for
with the Reishi mushroom flavour. I could sense a subtle savoury note,
but, ultimately, all I could taste was the dark chocolate with some
walnut notes. Nonetheless, the bar was delicious. The dark chocolate was
very smooth and flavoursome and the walnuts gave a wonderful nutty and
earthy flavour and texture. If it were just a “walnut and dark chocolate
bar”, I’d give it 10 out of 10, but it isn’t. I would deduct 3 for the
total lack of mushroom flavour. I do like the packaging but I would
prefer some walnuts on there, too.
The Super Dark Coconut Ash and Banana Bar
Since the packaging states "Sri Lankan coconut" as well as "charcoal coconut ash" and has images of coconut pieces as well as ash, one would assume that this bar contained coconut. Upon trying the bar, banana was all I could taste with the dark chocolate. I checked the ingredients list and it read coconut ash and no other form of coconut. I think that, although I find the packaging very artistic and eye-catching, it is also a little deceiving. Like the spirulina, I think that the coconut ash is there purely for the "super food" properties. I did enjoy the subtle, natural banana flavour in this bar, but I would have preferred a little coconut flavour and texture.
The Super Dark Açai and Goldenberry Bar
I admit that I’m not familiar with the flavour of açai but I expected it to be quite tart, like the physalis. I was pleasantly surprised how much I enjoyed the acidity of the fruits with the bitter dark chocolate. The flavours work really well together and give the bar a refreshing zing, different from that of citrus. I think that the packaging is very attractive along with the rest of the collection.
I'm fascinated by many of the products from Vosges and wish that I could try them all. I hope that they expand their business to the UK at some point. I have added these bars to my mini "Chocolate Library" which I keep in a shoebox. I look forward to expanding my collection as I discover more exciting chocolate bars!
I first discovered Vosges Haut Chocolat when I came across Mo's Dark Bacon Bar in a local supermarket in Davis, California. At work, I have been co-writing an article about innovative new confectionery products for Kennedy's Confection Magazine each month. During my searches I came across Vosges again and I have fallen in love! Some of their bars sounded really interesting and unusual and nothing like I had tried before.
I decided that I had to try some of them. I checked the cost of international shipping and was quite shocked to find that it was $75! When I used to live in California and posted things to friends at home it cost around $20. I have a friend who lives in Los Angeles so I asked him if he could do me a huge favour by going to a Vosges Haut Chocolat store in Beverly Hills, buying me some of these incredible bars and posting them to me and reimburse him. He happily accepted this assignment and, through the power of today's technology, he included me in the shopping experience by sending various images of the inside the store. We also exchanged a few phone calls through Viber.
There was an offer of 6 bars for the price of 5, so he bought the Effie and Katniss bars from their "Hunger Games Catching Fire" collection and the Matcha Green Tea, Reishi Mushroom & Walnut, Açai & Goldenberry, and Coconut Ash & Banana bars from their "Super Dark" collection. This came to a total of $37.50 which was expensive but I felt that it was worth it. He posted them and told me that it cost a whopping $52.50! I was shocked but it was too late to go back by then. I transferred the money - $90 for six 85g chocolate bars! This was painful, but I managed to justify it to myself because I have been lucky enough to receive many free chocolate samples throughout my career.
The Effie Bar
Of course, the Effie Trinket bar had to contain pink and purple! I
was a little unsure about combining dark chocolate with the subtle
flavours of strawberry and violet but it works surprisingly well and the
dark chocolate does not overpower the other flavours. There are subtle
hints of both as one chews through the delicious dark chocolate. Effie
would be proud! I would say, however, that the packaging could be a
little more exciting and include a photo or, even better, an
illustration of the character.
The Katniss Bar
This is the one that I was most excited about and I was not
disappointed! The creaminess of the milk chocolate was a perfect match
for the salty and smoky chunks of bacon. It was great to have something
to chew on rather than just have the flavour running through the
chocolate. I love the idea of putting pork and apple in a chocolate bar –
I’m sure that wild turkey, squirrel or rabbit wouldn’t have gone down
as well (for those of you who haven't read the Hunger Games, Katniss
frequently hunted these animals)! Like every form of dried apple which I
have tried in my experience, it softened and got a little stuck in the
teeth on consumption. I assume that this is unavoidable, however, I
would prefer more apple flavour in the bar as it was minimal. Again, I
think that the packaging could be more exciting with an illustration of
Katniss on the front rather than one block of colour.
The Super Dark Matcha Green Tea, Spirulina and Cocoa Nib Bar
Although I’m not the greatest fan of green tea, Vosges have really
hit the nail on the head with this bar. The balance of green tea flavour
with the dark chocolate works really well and the bar is enhanced by a
crunchy texture from the cacao nibs. Spirulina isn’t particularly tasty,
so it’s great that I can’t detect this flavour in the bar (I think that
the main reason for its presence is for the “super food” properties). I
think the packaging is stunning!
The Super Dark Reishi Mushroom and Walnut Bar
The Super Dark Coconut Ash and Banana Bar Since the packaging states "Sri Lankan coconut" as well as "charcoal coconut ash" and has images of coconut pieces as well as ash, one would assume that this bar contained coconut. Upon trying the bar, banana was all I could taste with the dark chocolate. I checked the ingredients list and it read coconut ash and no other form of coconut. I think that, although I find the packaging very artistic and eye-catching, it is also a little deceiving. Like the spirulina, I think that the coconut ash is there purely for the "super food" properties. I did enjoy the subtle, natural banana flavour in this bar, but I would have preferred a little coconut flavour and texture.
The Super Dark Açai and Goldenberry Bar
I admit that I’m not familiar with the flavour of açai but I expected it to be quite tart, like the physalis. I was pleasantly surprised how much I enjoyed the acidity of the fruits with the bitter dark chocolate. The flavours work really well together and give the bar a refreshing zing, different from that of citrus. I think that the packaging is very attractive along with the rest of the collection.
I'm fascinated by many of the products from Vosges and wish that I could try them all. I hope that they expand their business to the UK at some point. I have added these bars to my mini "Chocolate Library" which I keep in a shoebox. I look forward to expanding my collection as I discover more exciting chocolate bars!
Labels:
acai,
apple,
bacon,
banana,
cacao,
California,
chocolate,
chocolate review,
cocoa,
coconut,
matcha,
mushroom,
physalis,
review,
spirulina,
strawberry,
Vosges Haut Chocolat,
walnuts
Sunday, 2 March 2014
Rabot 1745 - Borough Market, London
Dear readers,
The day after I got back from Costa Rica I visited the new Hotel Chocolat restaurant in Borough Market - Rabot 1745. It was the perfect way to complete my holiday and catch up with friends, over more chocolate! Every dish contains cacao (roasted cocoa beans) in some form or other. Apparently cacao has been used in savoury cuisine far longer that it has with confectionery. I already knew that chocolate can be very versatile, but I was keen to see how cacao works in savoury dishes too.
We started the meal with a cacao bean tasting. The beans were from Vietnam and tasted quite different from those that I had been eating for the previous couple of weeks at La Iguana. I happened to have some of my roasted beans from La Iguana in my bag and it was great to be able to compare them.
For dessert, I ordered the Coconut Milk and Rum Panna Cotta. This was served with a fresh papaya and mango salsa and a small cacao-nibbed biscuit. There was a subtle warmth from the rum and the creamy flavours of the rum and coconut melted over the tongue with each spoonful. This was delectable, as I'd hoped it would be!
The day after I got back from Costa Rica I visited the new Hotel Chocolat restaurant in Borough Market - Rabot 1745. It was the perfect way to complete my holiday and catch up with friends, over more chocolate! Every dish contains cacao (roasted cocoa beans) in some form or other. Apparently cacao has been used in savoury cuisine far longer that it has with confectionery. I already knew that chocolate can be very versatile, but I was keen to see how cacao works in savoury dishes too.
We started the meal with a cacao bean tasting. The beans were from Vietnam and tasted quite different from those that I had been eating for the previous couple of weeks at La Iguana. I happened to have some of my roasted beans from La Iguana in my bag and it was great to be able to compare them.
After my experience with the delicious flavours of the fresh cacao pulp at La Iguana, there was no contest when it came to deciding which drink to order; the Fresh Cacao Bellini. The taste wasn't the same as that of the exotic mangosteen flavour that I experienced in Costa Rica but it was still delicious, especially with the bubbles! Apparently different varieties of cacao pods have different exotic fruit flavours in the pulp such as mango; I can't wait to try some more!
We were offered a complementary amuse-bouche of butternut squash soup served with cacao buttered and nibbed bread. This was a lovely surprise and great way to warm up the palate.
For my starter I chose the Scallop Salad. This included Seared Scottish scallops, beet carpaccio, apple-beet matchsticks, wintercress leaves, curried nib oil and a horseradish white chocolate condiment. This was a great collection of flavours and textures.
For my main I ordered the Creole Monkfish. This dish consisted of Cacao-creole spiced Cornish monkfish, roasted and served with caramelised fennel and artichoke, winter greens and Marcona almond purée. This was another intriguing collection of textures and flavours; beautifully cooked monkfish with a variety of spices and the smooth almond paste. I mopped up every last residue!
For dessert, I ordered the Coconut Milk and Rum Panna Cotta. This was served with a fresh papaya and mango salsa and a small cacao-nibbed biscuit. There was a subtle warmth from the rum and the creamy flavours of the rum and coconut melted over the tongue with each spoonful. This was delectable, as I'd hoped it would be!
I ended the meal with a Saint Lucian Hot Chocolate. I thoroughly enjoyed the meal at Rabot 1745. The service was faultless - we were attended to our every need yet we never felt hassled. I can't wait to return and try some of the other dishes (and drinks)!
Labels:
cacao,
chocolate,
cocoa,
cocoa beans,
Hotel Chocolat,
restaurant
Saturday, 28 December 2013
Champagne Macarons
Dear readers,
I wanted to create a recipe using popping candy and I thought that champagne macarons would be the perfect vehicle for this ingredient. It was also a great time of year to eat champagne macarons and I had managed to save a little champagne from my birthday earlier in the month.
I was unsure on how to incorporate the popping candy since the 'pop' would disappear if it came into contact with anything wet. I came across this recipe where the popping candy had been coated with white chocolate to protect the chocolate from the moisture in the buttercream.
Notes:
The chocolate certainly helped protect the popping candy from the moisture in the buttercream, however, after a couple of days the 'popping' had significantly reduced. Therefore, I would recommend eating the macarons as quickly as possible after they have been made.
I left the piped macaron circles to rest by a radiator, since it was the middle of December when I made these. If the circles are dry to touch then they are ready. If they are not, leave them to rest a little longer.
The champagne flavour was very subtle but it was detectable. I was thinking about combining the champagne with another flavour in the shells, but I am very glad that I decided not to because I am sure that it would have taken away the champagne flavour in the buttercream.
I found these macarons to be more successful (structure-wise) than my previous Kaffir Lime and Coconut Macarons. I was quite impressed when they baked first time with perfect feet and a lovely sheen on the top! I think that the banging of the piped circles is a very important step when making macarons.
I wish you all a wonderful New Year. I will be abroad working with chocolate and hope to post about it soon!
I wanted to create a recipe using popping candy and I thought that champagne macarons would be the perfect vehicle for this ingredient. It was also a great time of year to eat champagne macarons and I had managed to save a little champagne from my birthday earlier in the month.
I was unsure on how to incorporate the popping candy since the 'pop' would disappear if it came into contact with anything wet. I came across this recipe where the popping candy had been coated with white chocolate to protect the chocolate from the moisture in the buttercream.
I used the same base recipe and method as I did for my Kaffir Lime and Coconut Macarons, and followed the idea of coating the popping candy from The Little Loaf.
Champagne Macarons
90g egg white
140g + 200g icing sugar
100g ground almonds
44g caster sugar
45ml champagne
100g butter
100g white chocolate
50g popping candy
Gold edible lustre
This recipe will make around 32 macarons (64 shells).
Sieve the almonds and 140g of the icing sugar together. Whisk
the egg whites until they become stiff, then add the caster sugar and whisk until stiff again. Fold in the sieved icing sugar and ground almonds. Stir a few times until
the batter has a runny consistency. Pour the mixture into a piping bag
and pipe circles of the mixture onto silicone baking sheets. Bang the baking tray gently on a flat surface to help the circles flatten and remove excess air. Leave to
rest for 45 minutes. Preheat the oven to 170°C. Place the macarons in the oven and immediately turn the temperature down to 140°C.
Place a wooden spoon in the door of the oven to hold it ajar for the
duration of the cooking. Bake for 18 minutes, then set aside to cool
before removing from the baking sheet. Gently dust the shells with gold edible lustre.
Gently melt the white chocolate in the microwave. Pour in the popping candy, mix well and then pour out onto baking paper. Allow to cool then peel off of the baking paper and break it up into small pieces.
Sieve 200g icing sugar and cream with the butter, then mix in the champagne. Pipe the buttercream onto the base of one shell, place in a couple of pieces of popping candy chocolate, add a little more buttercream and glue together with another shell. Repeat until all shells have been glued together.
The chocolate certainly helped protect the popping candy from the moisture in the buttercream, however, after a couple of days the 'popping' had significantly reduced. Therefore, I would recommend eating the macarons as quickly as possible after they have been made.
I left the piped macaron circles to rest by a radiator, since it was the middle of December when I made these. If the circles are dry to touch then they are ready. If they are not, leave them to rest a little longer.
The champagne flavour was very subtle but it was detectable. I was thinking about combining the champagne with another flavour in the shells, but I am very glad that I decided not to because I am sure that it would have taken away the champagne flavour in the buttercream.
I found these macarons to be more successful (structure-wise) than my previous Kaffir Lime and Coconut Macarons. I was quite impressed when they baked first time with perfect feet and a lovely sheen on the top! I think that the banging of the piped circles is a very important step when making macarons.
I couldn't resist including a photo with my beautiful red sparkly Christmas nails!
I wish you all a wonderful New Year. I will be abroad working with chocolate and hope to post about it soon!
Labels:
champagne,
gold lustre,
macarons,
popping candy
Thursday, 28 November 2013
Blue Cheese Brownies
Dear readers,
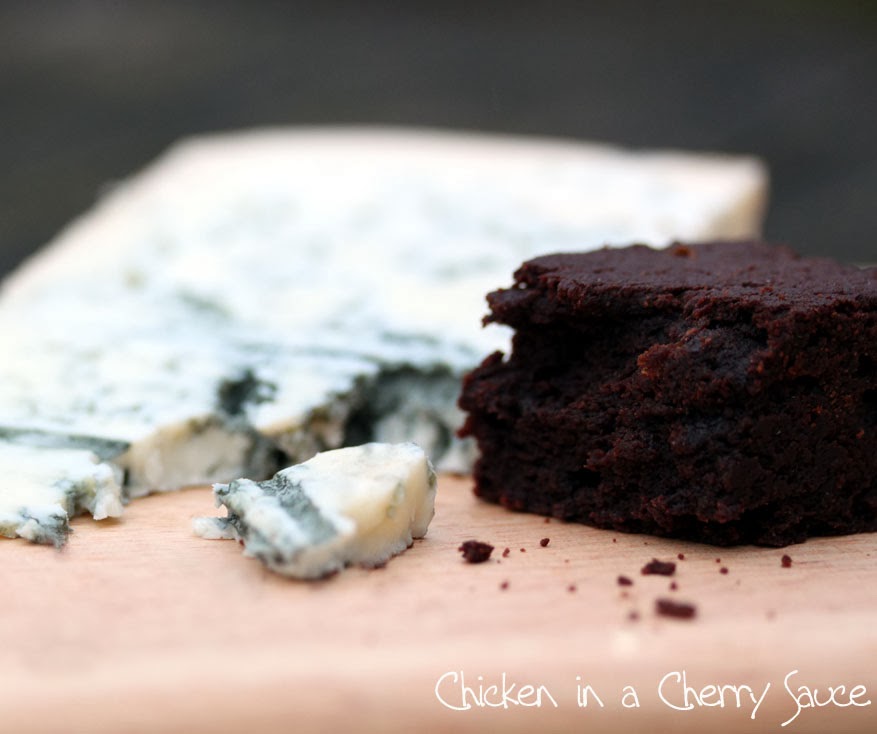
There have been some interesting developments in brownie recipes recently; the latest trend being the addition of marmite. I remembered one Chemistry lesson when I was in college and we watched a clip of Heston Blumenthal making a chocolate fondant with blue cheese. Until I made these brownies, I'd never tasted chocolate and blue cheese together before. I searched the internet and couldn't find any existing brownie recipes with blue cheese. I did, however, come across a blue cheese truffle recipe.
I am no expert on blue cheese but I chose to use gorgonzola because I love the pungency and tanginess of it. I also love the sound of the word gorgonzola! However, I am sure that this recipe would work well with any type of blue cheese. I used the same base recipe as I did for my Salted and Spiced Dulce de Leche Brownies.
Blue Cheese Brownies
200g good quality dark chocolate
200g butter
100g blue cheese
250g caster sugar
3 medium eggs
125g plain flour
Melt the chocolate, cheese and butter in a bowl over a pan of hot water and set aside to cool slightly.
Whisk the eggs with the sugar and mix with the cooled chocolate, cheese and butter. Sieve and stir in the cocoa and flour. Pour the mixture into a greased and lined baking tray. Bake for 25 minutes at 190°C. Slice once cooled.
Notes:
I cooked these brownies for 30 minutes and they turned out a little dry, so I have reduced the baking time to 25 minutes in this recipe.
I found these brownies truly fascinating! The gorgonzola flavour was very subtle but added a deep, tangy complexity of flavours which came through near the end of each bite. I was very impressed and surprised at how delicious they were; I was half expecting them to turn out to be inedible! This recipe seems to achieve the perfect balance - if there were any more cheese I think that they would taste unpleasant.
I took these brownies into work (I work with a number of Food Scientists) and, as an experiment, I asked my colleagues to sample the brownies to see if they could guess the secret ingredient. It was great fun! Some suggested marmite, a few suggested stock cubes and one colleague even suggested green tea! A few picked up on the cheesy notes, however, only one person guessed the secret ingredient correctly (after a struggle!). In fact, they were from the Sensory department and have been working in Food Sensory Science for over 15 years! So, perhaps their correct conclusion doesn't count, since they are trained for this exact type of research!
In conclusion, these brownies caused quite a stir (to say the least!) and I now have my colleagues asking me if I will be continuing this "Monday Taster Challenge". I thoroughly recommend to anyone interested to have a go at making them, even if it is just to see people strive to guess the secret ingredient! I wonder if these actually have been made before, I find it difficult to believe that they haven't. I also wonder if blue cheese brownies will be the next flavour trend after the 'Marmite Brownies'. We shall see...
There have been some interesting developments in brownie recipes recently; the latest trend being the addition of marmite. I remembered one Chemistry lesson when I was in college and we watched a clip of Heston Blumenthal making a chocolate fondant with blue cheese. Until I made these brownies, I'd never tasted chocolate and blue cheese together before. I searched the internet and couldn't find any existing brownie recipes with blue cheese. I did, however, come across a blue cheese truffle recipe.
I am no expert on blue cheese but I chose to use gorgonzola because I love the pungency and tanginess of it. I also love the sound of the word gorgonzola! However, I am sure that this recipe would work well with any type of blue cheese. I used the same base recipe as I did for my Salted and Spiced Dulce de Leche Brownies.
Blue Cheese Brownies
200g good quality dark chocolate
200g butter
100g blue cheese
250g caster sugar
3 medium eggs
125g plain flour
Melt the chocolate, cheese and butter in a bowl over a pan of hot water and set aside to cool slightly.
Whisk the eggs with the sugar and mix with the cooled chocolate, cheese and butter. Sieve and stir in the cocoa and flour. Pour the mixture into a greased and lined baking tray. Bake for 25 minutes at 190°C. Slice once cooled.
Notes:I cooked these brownies for 30 minutes and they turned out a little dry, so I have reduced the baking time to 25 minutes in this recipe.
I found these brownies truly fascinating! The gorgonzola flavour was very subtle but added a deep, tangy complexity of flavours which came through near the end of each bite. I was very impressed and surprised at how delicious they were; I was half expecting them to turn out to be inedible! This recipe seems to achieve the perfect balance - if there were any more cheese I think that they would taste unpleasant.
I took these brownies into work (I work with a number of Food Scientists) and, as an experiment, I asked my colleagues to sample the brownies to see if they could guess the secret ingredient. It was great fun! Some suggested marmite, a few suggested stock cubes and one colleague even suggested green tea! A few picked up on the cheesy notes, however, only one person guessed the secret ingredient correctly (after a struggle!). In fact, they were from the Sensory department and have been working in Food Sensory Science for over 15 years! So, perhaps their correct conclusion doesn't count, since they are trained for this exact type of research!
In conclusion, these brownies caused quite a stir (to say the least!) and I now have my colleagues asking me if I will be continuing this "Monday Taster Challenge". I thoroughly recommend to anyone interested to have a go at making them, even if it is just to see people strive to guess the secret ingredient! I wonder if these actually have been made before, I find it difficult to believe that they haven't. I also wonder if blue cheese brownies will be the next flavour trend after the 'Marmite Brownies'. We shall see...
Labels:
blue cheese,
brownie,
cacao,
cheese,
chocolate,
cocoa,
gorgonzola
Subscribe to:
Posts (Atom)